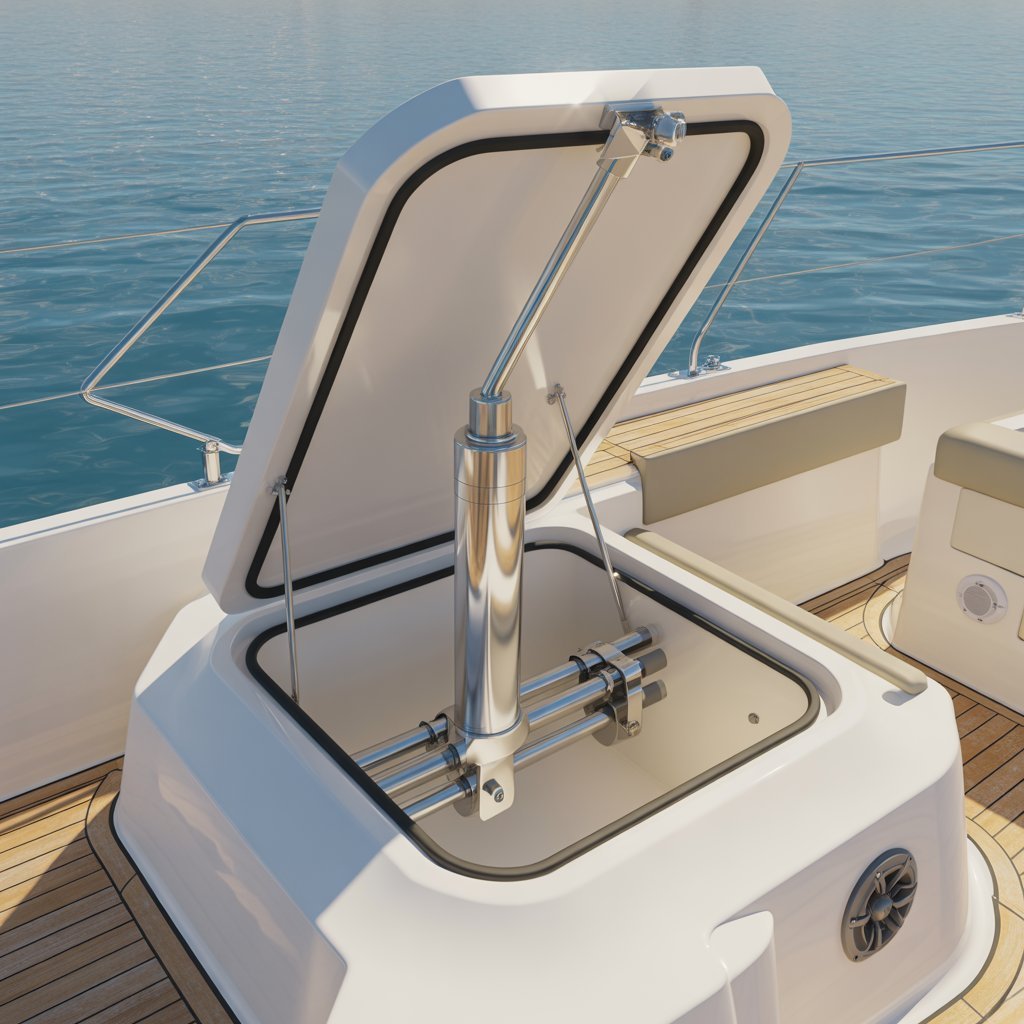
Automating a boat hatch makes access easier and safer. In addition, a linear actuator lifts and lowers the hatch in a smooth and controlled way. As a result, the system reduces strain on hinges and prevents sudden drops. Therefore, it is useful for storage lids, engine bays, and other compartments on a boat.
Why Use a Linear Actuator?
A linear actuator creates straight push-and-pull motion. Moreover, it uses electric power to move the hatch up or down. Marine-grade models handle water, salt, and moisture. Because of this, they work well in harsh environments. In the end, the system stays reliable for a long time.
Main Components
1. Marine-Grade Linear Actuator
This is the main lifting part. However, it must have a high IP rating like IP66 or IP68. It must also match the hatch weight and the needed stroke length.
2. Control Box
The control box manages power. Also, it keeps two actuators in sync if you use more than one.
3. Control Switch or Remote
A rocker switch, toggle switch, or remote gives simple up and down movement. In addition, it allows easy access from a safe spot.
4. Power Supply
Most boats use 12V or 24V DC. Therefore, the power system must supply enough current for the actuator.
5. Mounting Brackets
Strong brackets hold the actuator in place. Meanwhile, corrosion-resistant materials help the system last longer. Good alignment also keeps the movement smooth.
6. Wiring and Fuse
Use the correct wire gauge and a fuse, such as a 30A AGC fuse. This way, the system stays protected from overload.
7. Safety Features (Optional)
Manual override, limit switches, or feedback sensors increase safety. Moreover, they help stop the hatch at accurate positions.
Installation Steps
1. Select the Right Actuator
Measure the hatch weight. Afterward, choose the force and stroke length. Online tools also help with this choice.
2. Install the Mounts
Attach the brackets to the boat frame and the hatch lid. Next, keep the actuator in a straight line to prevent binding.
3. Connect the Wiring
Connect the actuator to the control box and power supply. Then, check the polarity. A fuse must also be added for protection.
4. Test the Movement
Test the hatch several times. If needed, adjust the brackets. This ensures the hatch opens and closes smoothly.
5. Secure the System
Tie the wires neatly. Finally, add covers to protect them from water.
How the System Works
A DC actuator changes direction when the polarity reverses. Because of this, one direction opens the hatch and the other closes it. A control box with feedback can stop the hatch at set points. Moreover, it keeps two actuators balanced during movement.
Conclusion
A linear actuator makes a boat hatch easier and safer to use. In addition, the system is simple, strong, and reliable. With proper setup, it will run smoothly for many years. Therefore, it is an ideal upgrade for most boats.
Kathir Sudhir Automation India specializes in advanced motion control systems, industrial automation solutions, and medical-grade linear actuator technologies for healthcare and rehabilitation equipment manufacturers.
With recognized industry certifications and multiple awards for innovation in automation systems, the company delivers reliable, high-performance electromechanical solutions tailored for medical and industrial applications.
Certifications & Recognition
Zed Bronze Certificate
Member at Confederation of Indian Industry (CII)
TANSTIA Member Certificate